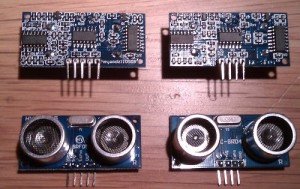
Both these ultrasonic range modules are fairly cheap modules, expect the HY-SRF05 to be the more expensive of the these two.

At a quick glance there are only small differences between these two:
| |
HC-SR04 |
HY-SRF05 |
| Working Voltage |
5 VDC |
5 VDC |
| Static current |
< 2mA |
<2 mA |
| Output signal: |
Electric frequency signal, high level 5V, low level 0V |
Electric frequency signal, high level 5V, low level 0V |
| Sensor angle |
< 15 degrees |
< 15 degrees |
| Detection distance (claimed) |
2cm-450cm |
2cm-450cm |
| precision |
~3 mm |
~2 mm |
| Input trigger signal |
10us TTL impulse |
10us TTL impulse |
| Echo signal |
output TTL PWL signal |
output TTL PWL signal |
| Pins |
- VCC
- trig(T)
- echo(R)
- GND
|
- VCC
- trig(T)
- echo(R)
- OUT
- GND
|
Not sure what the out pin is about, I have seen claims that it goes high when it detects a obstacle.
From my personal observations the HY-SRF05 seems like a slightly more accurate sensor and seems to have a much better range [I even got it to measure beyond the 4.5 meters it claims] – but if I were to build for instance a robot that should not collide with a wall that would not matter.
In short a ultrasonic sensor like this works like:
- Send a pulse signal to I/O TRIG which is at least 10us long, this will activate the module to start detecting
- The ultrasonic module will automatically send eight 40khz square waves, and will automatically detect when there is a reflect signal;
- When there is an reflect signal back, the ECHO I/O will output a high level, the duration of the high-level signal is the time from untral sonic launch to return. As a result, the Measured distance = (T(Time of High Level output ) * (340M / S)) / 2 The reason for the division by two is that since this is a echo it has traveled both to and from the object. Note the speed of sound is dependent of the temperature so keep that in mind if you need accuracy
And here comes a code sample that works with both of these
/*
Tested with HY-SRF05, HC-SR04
Assuming a room temp of 20 degrees centigrade
The circuit:
	* VVC connection of the sensor attached to +5V
	* GND connection of the sensor attached to ground
	* TRIG connection of the sensor attached to digital pin 12
        * ECHO connection of the sensor attached to digital pin 13
*/

const int TRIG_PIN = 12;
const int ECHO_PIN = 13;

void setup() {
  // initialize serial communication:
  Serial.begin(9600);

  pinMode(TRIG_PIN,OUTPUT);
  pinMode(ECHO_PIN,INPUT);
}

void loop()
{
   long duration, distanceCm, distanceIn;

  // Give a short LOW pulse beforehand to ensure a clean HIGH pulse:
  digitalWrite(TRIG_PIN, LOW);
  delayMicroseconds(2);
  digitalWrite(TRIG_PIN, HIGH);
  delayMicroseconds(10);
  digitalWrite(TRIG_PIN, LOW);
  duration = pulseIn(ECHO_PIN,HIGH);

  // convert the time into a distance
  distanceCm = duration / 29.1 / 2 ;
  distanceIn = duration / 74 / 2;

  if (distanceCm <= 0){
    Serial.println("Out of range");
  }
  else {
    Serial.print(distanceIn);
    Serial.print("in, ");
    Serial.print(distanceCm);
    Serial.print("cm");
    Serial.println();
  }
  delay(1000);
} |
/*
Tested with HY-SRF05, HC-SR04
Assuming a room temp of 20 degrees centigrade
The circuit:
* VVC connection of the sensor attached to +5V
* GND connection of the sensor attached to ground
* TRIG connection of the sensor attached to digital pin 12
* ECHO connection of the sensor attached to digital pin 13
*/
const int TRIG_PIN = 12;
const int ECHO_PIN = 13;
void setup() {
// initialize serial communication:
Serial.begin(9600);
pinMode(TRIG_PIN,OUTPUT);
pinMode(ECHO_PIN,INPUT);
}
void loop()
{
long duration, distanceCm, distanceIn;
// Give a short LOW pulse beforehand to ensure a clean HIGH pulse:
digitalWrite(TRIG_PIN, LOW);
delayMicroseconds(2);
digitalWrite(TRIG_PIN, HIGH);
delayMicroseconds(10);
digitalWrite(TRIG_PIN, LOW);
duration = pulseIn(ECHO_PIN,HIGH);
// convert the time into a distance
distanceCm = duration / 29.1 / 2 ;
distanceIn = duration / 74 / 2;
if (distanceCm <= 0){
Serial.println("Out of range");
}
else {
Serial.print(distanceIn);
Serial.print("in, ");
Serial.print(distanceCm);
Serial.print("cm");
Serial.println();
}
delay(1000);
}
And something that I noticed is very important is the quality of the 5V I got from my USB port when the Arduino was hooked up. At first I got a very noisy signal that was only able to detect ranges of about 10 cm, but after I swapped the connection to not use a usb-hub the results were much better.
And to finish off here comes a bit more about how to calculate the distance based on the time for the sound:
c = 331.3 + 0.606 × Temperature_in_C
so for 20 degrees it would be
c = 331.3 + 0.606 × 20 = 343.42 m/s
And for a lot better explenation, check out wikipedia

