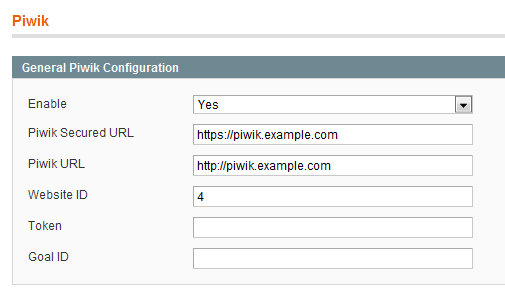
Magento: Adding piwik tracking

Using piwik to track Magento visitors is a easy thing to do.

In Magento Connect there is a plugin to install

See my earlier post if you don’t wish to turn your site to alpha on all packages.

For the settings, most are self explaining, the token can be found in piwik under API and is labeled API key, please read the warnings about using it and consider if you will need it.

Magento: Failed to download package X within preferred state “stable”, latest release is version 0.4, stability “alpha” (or “beta”), use “channel://…

If you do not wish to move your entire server to use alpha mode (or beta) but keep the mainline in stable, but still wish to install the actual package; you just
enter the information from channel and on and the plug in will install.

$:/var/www/magento$ ./pear install magento-community/Florent_Piwik
Failed to download magento-community/Florent_Piwik within preferred state "stable", latest release is version 0.4, stability "alpha", use "channel://connect.magentocommerce.com/community/Florent_Piwik-0.4" to install
install failed
$/var/www/magento$ ./pear install channel://connect.magentocommerce.com/community/Florent_Piwik-0.4
downloading Florent_Piwik-0.4.tgz ...
Starting to download Florent_Piwik-0.4.tgz (4,163 bytes)
.....done: 4,163 bytes
install ok: channel://connect.magentocommerce.com/community/Florent_Piwik-0.4

Magento: Starting SOAP (adding a user)

In order to get SOAP up and running you will need to add a web services user in the admin panel.

    First add a role for the user. (Roles are used to limit the permissions of the user)

    • System->Web Services->Roles->Add new role
    • Give the role a name
    • Set permissions for the role
  • Then create the user with these permissions
    • System->Web Services->Users->Add new user
    • Add information about the user (the API key is the password used for SOAP)
    • Under roles bind the user with the previously created role

Magento: Installing on a debian server

To install magento on a fresh server use the following.

  • Install apache, mysql and PHP5 “$ apt-get install apache2 mysql-server php5 php5-mysql php-soap php5-mcrypt php5-curl php5-gd”
  • Edit the vhost config for the apache site [/etc/apache2/sites-enabled/000-default]
    • Verify that “AllowOverride” is set to All for the magento directory
  • Make sure that mof_rewrite is loaded; use “$ a2enmod rewrite” and then reload apache2
  • Edit /etc/php5/apache2/php.ini
    • “memory_limit” [the manual says] no less than 256Mb (preferably 512)
    • “max_execution_time” [this is the max time that a script may be left running] SOAP requests take time, so make suer it is at a reasonable time
    • “upload_max_filesize” Set this to a size that is reasonable depending on what you plan to upload (manuals might be large)
    • “post_max_size” Set this to a size that is reasonable depending on what you plan to post (manuals might be large); also make sure that the value and the modifier is correct (so that it says 8M and not just 8 for instance)
    • “display_errors” Set to Off
    • “log_errors” Set to On
    • “error_log” Set to a file that you will be able to find [if you wish to have it in a subdir; create that as root and give it permissions as apache log dir]
  • download magento (lastest version from magento
  • Upack it (I choose bzip2 format) “$ tar -jxvvf magento-downloader-1.3.2.1.tar.bz2” and make sure the files gets put in the directory you wish
  • Some directories have to be writable to the webserver (and all subdirectories, where there are)
    • var
    • var/.htaccess
    • app/etc
    • media
  • If you are using the downloader installation
    • “$./pear mage-setup .”
    • “$./pear install magento-core/Mage_All_Latest”
    • “$rm -rf downloader/pearlib/cache/* downloader/pearlib/download/*”
  • Create database and database user [this is to do it manually via mysql console]
    • “$mysql -uroot -p”
    • “mysql> create database magento;”
    • “mysql> use mysql;”
    • “mysql> INSERT INTO user (Host,User,Password) VALUES (‘localhost’, ‘magento’, PASSWORD(‘password’));”
    • “mysql> GRANT ALL ON magento.* TO ‘magento’;”
    • “mysql> FLUSH PRIVILEGES;”
    • “mysql> exit”
  • Go to the webserver and complete the installation
  • If you get stuck on the configuration page [that you get back to it even after adding correct information]:
    • Check “AllowOverride” in the apache config.
    • Check “post_max_size2 in the php.ini [also check so that the value is either absolute or has a modifier; 8 means 8 bytes while 8M means 8Mb]

Magento: Selling string (cloth or any other item with a decimal value)

Some items (such as string, cloth, fluids etc) can be sold in decimal values.

This example will show how to sell string in meters (price etc) but where the customer can order any length – but at least 30 centimeters.

In admin->catalog make the string as a product and under inventory set “Minimum Qty Allowed in Shopping Cart” to “0.3” and “Qty Uses Decimals” to yes. Set up the price as the price per meter.
Also please make sure that the information about the product states that the any length (over 0,3 m) can be ordered and that the price is per meter.

When the customer adds 2.5678 m in the basket, magento will calculate the correct price and show it to the customer.

Magento: Using SOAP to get detailed product information

Here a code solution to using the SOAP interface in magento. This example will get all products (and plenty of information about each product).

1
2
3
4
5
6
7
8
9
10
11
12
13
14
15
16
17
18
19
20
21
22
23
24
25
26
27
28
29
30
31
$time_start = microtime(true);	
try{
	$devClient = new Soapclient('http://192.168.1.61/magento/index.php/api/?wsdl', array('trace'=>1, 'exceptions'=>1));
	$devSession = $devClient->login('apiuser', 'apipassword');
 
	$productList = $devClient->call($devSession, 'catalog_product.list');
	foreach ($productList as $product){
		$theProduct = array();
		$theProduct['product'] = $product;
		$theProduct['attributeSet'] = current($devClient->call($devSession, 'product_attribute_set.list'));
		$theProduct['info'] = $devClient->call($devSession, 'catalog_product.info', $product['sku']);
		$theProduct['related'] = $devClient->call($devSession, 'catalog_product_link.list', array('related', $product['sku']));
		$theProduct['up_sell'] = $devClient->call($devSession, 'catalog_product_link.list', array('up_sell', $product['sku']));
		$theProduct['cross_sell'] = $devClient->call($devSession, 'catalog_product_link.list', array('cross_sell', $product['sku']));
		$theProduct['grouped'] = $devClient->call($devSession, 'catalog_product_link.list', array('grouped', $product['sku']));
		$theProduct['images'] = $devClient->call($devSession, 'catalog_product_attribute_media.list', $product['sku']);
		$theProduct['tierprice'] = $devClient->call($devSession, 'product_tier_price.info', $product['sku']);
		$theProduct['stock'] = $devClient->call($devSession, 'product_stock.list', $product['sku']);
 
		$allProducts[] = $theProduct;
	}
	echo '$allProducts: <pre>' . print_r($allProducts, true) . '</pre>';
 
}
catch (Exception $e){
	echo 'Error on line '. $e->getLine().' in '. $e->getFile() . $e->getMessage();
}
 
$time_end = microtime(true);
$time = $time_end - $time_start;
echo "<br/><br/>execution time " . $time;

More info on the SOAP API at Magento wiki

Magento – using etc/system.xml to controll a modules visibility in the admin interface

In the admin interface it is possible to alter setting on a “default”, “website” or “store” level.
Whether or not the module is visible [and configurable] in these is controlled by the modules config file (most commonly saved as “etc/system.xml”)

There are some lines that looks like:

<show_in_default>1</show_in_default>
<show_in_website>0</show_in_website>
<show_in_store>0</show_in_store>

The variables are fairly self explanatory; 0 is don’t show, 1 is show [I have also seen 2 but I haven’t figured that one out yet]

Magento admin, make it possible to enter DIBS login information on a per store basis

If you are using the DIBS module from MagentoConnect it is possible to set up DIBS accounts as default configuration (all sites & stores) and website (and all stores under that).

If you would like to be able to set up one DIBS account per store, then you should edit the app/code/local/Mage/Dibs/etc/system.xml
Find the lines that look like

                        <active translate="label">
                            <label>Enabled</label>
                            <frontend_type>select</frontend_type>
                            <source_model>adminhtml/system_config_source_yesno</source_model>
                            <sort_order>1</sort_order>
                            <show_in_default>1</show_in_default>
                            <show_in_website>1</show_in_website>
                            <show_in_store>0</show_in_store>

and alter them to

                        <active translate="label">
                            <label>Enabled</label>
                            <frontend_type>select</frontend_type>
                            <source_model>adminhtml/system_config_source_yesno</source_model>
                            <sort_order>1</sort_order>
                            <show_in_default>1</show_in_default>
                            <show_in_website>1</show_in_website>
                            <show_in_store>1</show_in_store>

This should be done in several locations (this is controlled for each option in the plugin so make sure you edit it for all the options you wish to alter on a store level).

Send mail to several to-addresses

To send email to several recipients use

name <name@example.com>, name2 <name2@example.com>

the part inside the brackes (< & >) is the adress, the part before the < is the name shown as the recipient. The separation char for several addresses is “,”