Magento: Using SOAP to get detailed product information

Here a code solution to using the SOAP interface in magento. This example will get all products (and plenty of information about each product).

1
2
3
4
5
6
7
8
9
10
11
12
13
14
15
16
17
18
19
20
21
22
23
24
25
26
27
28
29
30
31
$time_start = microtime(true);	
try{
	$devClient = new Soapclient('http://192.168.1.61/magento/index.php/api/?wsdl', array('trace'=>1, 'exceptions'=>1));
	$devSession = $devClient->login('apiuser', 'apipassword');
 
	$productList = $devClient->call($devSession, 'catalog_product.list');
	foreach ($productList as $product){
		$theProduct = array();
		$theProduct['product'] = $product;
		$theProduct['attributeSet'] = current($devClient->call($devSession, 'product_attribute_set.list'));
		$theProduct['info'] = $devClient->call($devSession, 'catalog_product.info', $product['sku']);
		$theProduct['related'] = $devClient->call($devSession, 'catalog_product_link.list', array('related', $product['sku']));
		$theProduct['up_sell'] = $devClient->call($devSession, 'catalog_product_link.list', array('up_sell', $product['sku']));
		$theProduct['cross_sell'] = $devClient->call($devSession, 'catalog_product_link.list', array('cross_sell', $product['sku']));
		$theProduct['grouped'] = $devClient->call($devSession, 'catalog_product_link.list', array('grouped', $product['sku']));
		$theProduct['images'] = $devClient->call($devSession, 'catalog_product_attribute_media.list', $product['sku']);
		$theProduct['tierprice'] = $devClient->call($devSession, 'product_tier_price.info', $product['sku']);
		$theProduct['stock'] = $devClient->call($devSession, 'product_stock.list', $product['sku']);
 
		$allProducts[] = $theProduct;
	}
	echo '$allProducts: <pre>' . print_r($allProducts, true) . '</pre>';
 
}
catch (Exception $e){
	echo 'Error on line '. $e->getLine().' in '. $e->getFile() . $e->getMessage();
}
 
$time_end = microtime(true);
$time = $time_end - $time_start;
echo "<br/><br/>execution time " . $time;

More info on the SOAP API at Magento wiki

Magento – using etc/system.xml to controll a modules visibility in the admin interface

In the admin interface it is possible to alter setting on a “default”, “website” or “store” level.
Whether or not the module is visible [and configurable] in these is controlled by the modules config file (most commonly saved as “etc/system.xml”)

There are some lines that looks like:

<show_in_default>1</show_in_default>
<show_in_website>0</show_in_website>
<show_in_store>0</show_in_store>

The variables are fairly self explanatory; 0 is don’t show, 1 is show [I have also seen 2 but I haven’t figured that one out yet]

Magento admin, make it possible to enter DIBS login information on a per store basis

If you are using the DIBS module from MagentoConnect it is possible to set up DIBS accounts as default configuration (all sites & stores) and website (and all stores under that).

If you would like to be able to set up one DIBS account per store, then you should edit the app/code/local/Mage/Dibs/etc/system.xml
Find the lines that look like

                        <active translate="label">
                            <label>Enabled</label>
                            <frontend_type>select</frontend_type>
                            <source_model>adminhtml/system_config_source_yesno</source_model>
                            <sort_order>1</sort_order>
                            <show_in_default>1</show_in_default>
                            <show_in_website>1</show_in_website>
                            <show_in_store>0</show_in_store>

and alter them to

                        <active translate="label">
                            <label>Enabled</label>
                            <frontend_type>select</frontend_type>
                            <source_model>adminhtml/system_config_source_yesno</source_model>
                            <sort_order>1</sort_order>
                            <show_in_default>1</show_in_default>
                            <show_in_website>1</show_in_website>
                            <show_in_store>1</show_in_store>

This should be done in several locations (this is controlled for each option in the plugin so make sure you edit it for all the options you wish to alter on a store level).

Magento: Sending the info in the contact form to several email addresses

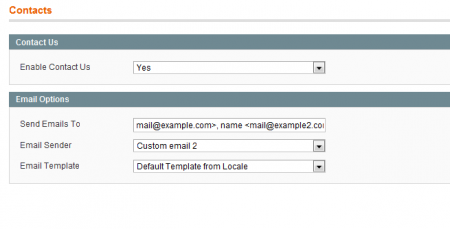
By default Magento only has one filed to input the recipient of the contact form (in admin).
If you would like to get this sent to several email addresses then a small hack is required as Magento adds some encding to address in this field.

Use

mail@example1.com>, name <mail@example2.com

to send to two recipients. name is the name shown as the address in the second mail.

Send contact form to two mail addressesv

To send to 3 addresses use

mail@example1.com>, name <mail@example2.com>,name2<mail@example3.com

To sent to 4 or more, just add more as in the 3 addresses example

Magento: Magento connect broken after moving to another path (www.example.com/test -> www.example.com)

The Magento Connect uses values stored in the directory downloader to know where to connect, where to save files etc. The problem is that these paths are hard coded into files at the installation of Magento.

If you wish to move your installation to a new path then this will break the Magento Connect in the admin panel.

The version that I find easiest to do on the new server is to log in using ssh and then run “./pear mage-setup .” That will reset the aboslute paths that are stored in the downloader directory.

Another option would be to re install magneto:

  • Upload a fresh copy of Magento onto the new server (don’t run the installer yet)
  • Copy over your Themes/Templates, Skins, Images, and Custom Modules
  • Dump the database from the original, and import the database to the new site
  • Run the installer – and enter all the necessary info
  • Go into the Magento Connect Manager, and install this extension: magento-core/Mage_All_Latest
  • Magento: Set shipping address to billing address by default (but retain the possibility to change it)

    This will set the delivery address to the billing address and with no other changes to the code, the user will still be able to change the delivery address by using the right menu. This simply updates the default behavior of what needs to be entered.

    In “app/design/frontend/default/blank/template/checkout/onepage/billing.phtml”
    Find the section that looks like:

    123
    124
    125
    126
    127
    128
    129
    130
    131
    132
    
        <?php if ($this->canShip()): ?>
            <li>
                <<input type="radio" name="billing[use_for_shipping]" id="billing:use_for_shipping_yes" value="1"<?php if ($this->isUseBillingAddressForShipping()) {?> checked="checked"<?php }?> onclick="$('shipping:same_as_billing').checked = true;" class="radio" /><label for="billing:use_for_shipping_yes"><?php echo  $this->__('Ship to this address') ?></label>
                <input type="radio" name="billing[use_for_shipping]" id="billing:use_for_shipping_no" value="0"<?php if (!$this->isUseBillingAddressForShipping()) {?> checked="checked"<?php }?> onclick="$('shipping:same_as_billing').checked = false;" class="radio" /><label for="billing:use_for_shipping_no"><?php echo $this->__('Ship to different address') ?></label>
            </li>
        <?php endif; ?>
        </ul>
        <?php if (!$this->canShip()): ?>
            <input type="hidden" name="billing[use_for_shipping]" value="1" />
        <?php endif; ?>

    And simply replace it by;

    123
    124
    
        </ul>
        <input type="hidden" name="billing[use_for_shipping]" value="1" />

    Magento: Changing the url “continue shopping” points at

    If you wish to repoint the “continue shopping” button in the shopping cart, then the file
    app/code/core/Mage/Checkout/Block/Cart.php (and don’t forget that the modified file should be copied to app/code/local/Mage/Checkout/Block/Cart.php ) is one place to do that from. (The code example below gives different results based on if the cart is empty or not)

    71
    72
    73
    74
    75
    76
    77
    78
    79
    80
    81
    82
    83
    
        public function getContinueShoppingUrl()
        {
    	//Mage::getUrl(page name in CMS under admin)
           //if the cart is not empty, return the user to the shop
    	if (Mage::helper('checkout/cart')->getCart()->getItemsCount() > 0)
    		$url = Mage::getUrl('home');
    	//if the cart is empty, return the user to the portal home.
    	else
    		$url = Mage::getUrl('portal');
            $this->setData('continue_shopping_url', $url);
     
            return $url;
        }

    Also you should edit the file app/design/frontend/default/blank/template/checkout/cart/noItems.phtml (blank is my skin)

    33
    
    <p><?php echo $this->__('Please <a href="%s">continue shopping</a>.', Mage::getUrl('portal')) ?></p>

    [This was done to Magento version 1.3.2.4]

    Magento: Send a email to store owner when a order is placed.

    It is not hard to set up a Magento multi store environment so when a order is placed in a store, a owner (one owner per store) gets a order confirmation email.
    Doing like this will give a copy of the mail that is sent to the customer, and that might not be nice – but this is quick.

    In admin, select the store you wish to enter the email address to, and under system > config > sales > sales e-mail override the site default with the email address you would like for this store.

    It is also possible to send copies of shipment notices, credit mails etc (basically all mail that is sent from the store).

    [Tested with v1.3.2.4]

    Magento: Problem with the Fontis WYSIWYG editor (FCKeditor) and {{store url=””}}

    The problem is that a link like <a href="{{store url=""}}"> gets converted to <a href="{{store url="> and that is a problem (it makes the link much longer and the page seams to be lacking a lot of text.

    One solution is to replace the "" (2 ") where the second disappears with ” (2 ‘).

    It is probably a very good idea to make this change on all " inside {{ }} to ‘s.

    However it is still a good idea to do this change in the code mode of the editor or it will do some of its magic on it.

    Magento: Problem with the Fontis WYSIWYG editor (FCKeditor) and custom database predix

    We were having lots of trouble getting the Configuration JavaScript working.
    The problem turned out to be that we are having a prefix in our database of magento, and the code was not handling this case.
    While setting up views in the db would have been one workaround…

    To find out if you are suffering from this issue as well, open the fontis_custom_config.php file in an browser – and if you see mysql errors then there is a problem – and below is a solution that worked for us.

    We did some edits to the js/fontis/fckeditor/fontis_custom_config.php file to make it handle database prefixes.
    added:

    28
    29
    
        $prefix = $xml->global->resources->db->table_prefix;
        $tablename = $prefix . "core_config_data";

    And then simply replace all the following instances of ‘core_config_data’ (without ‘s) with ‘” . $tablename .”‘ (again without ‘s) (as for insance)

    35
    
                "SELECT * FROM " . $tablename . " WHERE path = 'fontis_wysiwyg/fckeditor/usecustomtoolbarjs'"));