Web.Config use a defaultdocument from a subfolder

Using a default document located in a subfolder is easy, just fill in the path to the document, and it will be used (The path and document name will not be displayed in the browser).

<system.webServer>
  <defaultDocument enabled="true">
    <files>
      <clear/>
      <add value="path/to/page.ashx"/>
    </files>      
  </defaultDocument>
</system.webServer>

Internet Explorer 10 Turning Compatibility mode on (From server)

In order to turn Compatibility mode on for Internet Explorer the server should send “X-UA-Compatible” as a header with the value IE=EmulateIE9. This will force Internet explorer to use compatibility mode if it is a version higher than 9

If we using ISS (making for instance a asp.net project) the following web.config can be used to do this.

<configuration>
  <!-- Other settings -->
  <system.webServer>
    <httpProtocol>
      <customHeaders>
        <clear />
        <add name="X-UA-Compatible" value="IE=EmulateIE9" />
      </customHeaders>
    </httpProtocol>
  </system.webServer>
</configuration>

Mode details on the possible values for the header tag

Sometimes sending this as a header tag works, then this should be sent first in the header tag

<!DOCTYPE HTML PUBLIC "-//W3C//DTD HTML 4.0 Transitional//EN">
<html>
  <head>
    <meta http-equiv="X-UA-Compatible" content="IE=EmulateIE9" />

Internet Explorer 10 Turning Compatibility mode off (From server)

In order to turn Compatibility mode off for Internet Explorer the server should send “X-UA-Compatible” as a header with the value IE=Edge. This will force Internet explorer to use the latest mode the version has (this works from IE 6 to 11 and up)

If we using ISS (making for instance a asp.net project) the following web.config can be used to do this.

<configuration>
  <!-- Other settings -->
  <system.webServer>
    <httpProtocol>
      <customHeaders>
        <clear />
        <add name="X-UA-Compatible" value="IE=Edge" />
      </customHeaders>
    </httpProtocol>
  </system.webServer>
</configuration>

Mode details on the possible values for the header tag

using RedirectMatch to make Apache2 listen to several dns names and still not get content duplication

The trick we do here is to make one virtualhost for the “main” domain you wish indexed (and shown in browsers etc) and another one for all the other domains that will simply redirect to the main domain.

<VirtualHost *:80>
    ServerName example.com
    ServerAlias example.net
    ServerAlias example.biz
    RedirectMatch permanent /(.*) http://www.example.com/$1
</VirtualHost>
 
<VirtualHost *:80>
    ServerName www.example.com
    ... other stuffs ...
</VirtualHost>

Magento change store via url

In a multi store environment there is sometimes a need to change the store when the user clicks a link.
A “simple” way to do this is to pass the store along in the url (just add a “?___store=” either id or the store name, so for instance.

$stores = $category->getStoreIds();
echo '<p><a href="'. Mage::getUrl() . '?___store=' . end($stores). '">'.$category->getName()."</a></p>";

Magento: Get the skin url

When editing Magento tempates or CMS pages you will have a need to access images and other content inside the skin/—/images folder. Instead of making hard coded links in the CMS or templates a better way is to get this from Magento (one of the many reasons for doing this is that it will still work if something in the directory structure is changed – like say you dev server is dev.something/shopverige but the live store is directly on a domain like say http://www.shopsverige.se

Here is how to do it:

<!-- this is inside of .phtml files -->
<img src="<?php echo $this->getSkinUrl('images/coolimage.png'); ?>" alt="arrow"/>
 
<!-- use this is in cms block -->
<img src="{{skin url='images/coolerimage.png'}}" alt="" />

Magento Selling clothing (or anyother product with options) while having Magento keep track of stock

Creating confugurable products is more work than adding custom attributes but it might be better in some cases (keeping track of stock, having one set of attributes to select from etc).

In short the steps needed are

  1. Create the attributes that will be configurable by the user – for our example they will be Size and Color
  2. Create the attribute set that will be assigned to the variant products – for our example, we’ll call it “T-shirt”
  3. Create the individual variant products
  4. Create the configurable product, and add the “T-shirt” attribute set
  5. Add the individual variants to this configurable product

Create the attributes that will be configurable by the user – for our example they will be Size and Color
In the adminpanel this is under Catalog->Attributes->Manage Attributes
Scope needs to be set to Global and Input type to drop down. Once this is done then Use To Create Configurable Product is shown and this should be set to yes. Setting required to yes is a good idea as well.
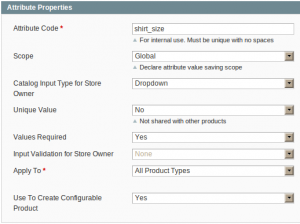
Under label / options create a label (for instance size) and give the different options it can take.
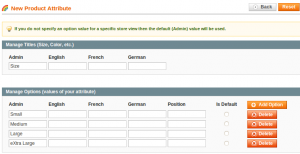
Repeat for all attributes you want to create (for instance size and color)

Create the attribute set that will be assigned to the variant products – for our example, we’ll call it “T-shirt”
Now we’re ready to create an attribute set called “T-shirt” to start using for this product. Go to “Catalog -> Attributes -> Manage Attribute Sets” and press “Add New Set”.
Give the new set a name and then drag and drop the attributes to the group where you want them to be when creating a product.
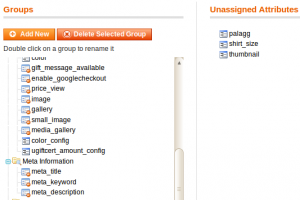
Create the individual variant products
Create a product and make sure that you use the attribute set you have created. Add the attributes where you placed them.


Repeat for all the products you have

Create the configurable product, and add the “T-shirt” attribute set

Add the individual variants to this configurable product
This can be done when the configurable product is created or later on using edit product.
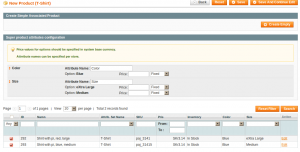
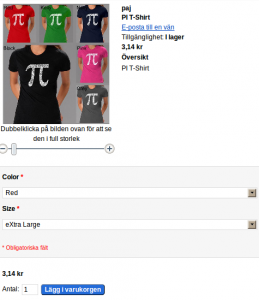
And then it should look something like this in the shop